Getting Started with Apama
This guide will walk you through setting up Apama on a local Debian environment using WSL2, integrating it with Visual Studio Code, and leveraging the Apama extension for development.
Step-by-Step Guide
Prerequisites
Make sure the following are installed:
- WSL2 (Windows only)
- Visual Studio Code
- Docker (must be accessible from WSL and usable within VS Code)
- Active internet connection to download required packages
Note: WSL is not needed if you’re using a Linux system.
Step 1: Install Visual Studio Code
If you haven’t already, install VS Code.
Step 2: Install the Apama & Dev Container Extension in VS Code
-
Open VS Code → Go to Extensions (
Ctrl+Shift+X) → Search forApama→ Install the extension.
Apama
-
Dev Containers


Step 3: Create a new or use existing Apama project
Launch VS Code
- Open VS Code from within WSL (
wslcommand in terminal)
code .
OR
- Start VS Code on your machine and connect to WSL using the Remote - WSL extension.
- Start VS code in your local machine
- Open Command Palette and click on -
WSL: Connect to WSL
Open the Command Palette
Use one of the following:
- Windows/Linux:
Ctrl + Shift + P - macOS:
Cmd + Shift + P - Or navigate to: View → Command Palette
Create the Apama Project
Option 1 - Getting started is easy - Use template repo
Clone the template Repo and start the container
-
Clone the template repo and create your own repo - streaming-analytics-sample-template-repo
) -
Open the Command Palette again and type:
Dev Container: Clone Repository in Container Volume -
Select
Github -
Paste your own github repo link you have created earlier using remplate repo
-
Select
main -
This will build and launch the dev container, and reopen your project inside it.
-
Add the required product bundle
Note - Delete the files which not required in your project

Option 2 - Start From Scratch or Existing Project
-
Create new Apama Project Folder
mkdir <YourApamaProjectFolder> -
Or Use your
existing Apama Project directory
Add Dev Container Configuration
If you’re starting from scratch or have an existing project:
-
Copy the
.devcontainer/directory and its contents (Dockerfile and devcontainer.json) from the GitHub repo:
streaming-analytics-sample-repo-template/.devcontainer -
Paste it into the root folder of your Apama project.

Add Project to Workspace
- Go to File → Add Folder to Workspace…
- Select your Apama project folder.
- You will now see your project under “Apama Projects” in the Explorer pane.

Open the Project in a Dev Container
- Open the Command Palette again and type:
Dev Container: Open Folder in Container - This will build and launch the dev container, and reopen your project inside it.
Create a New Apama Project (only if starting from scratch)
- In the Command Palette, type:
Apama: Create Project in new Folder - Select the folder where you’d like to create the project.
- Enter the same name for your new Apama project what you had used earlier or new one.
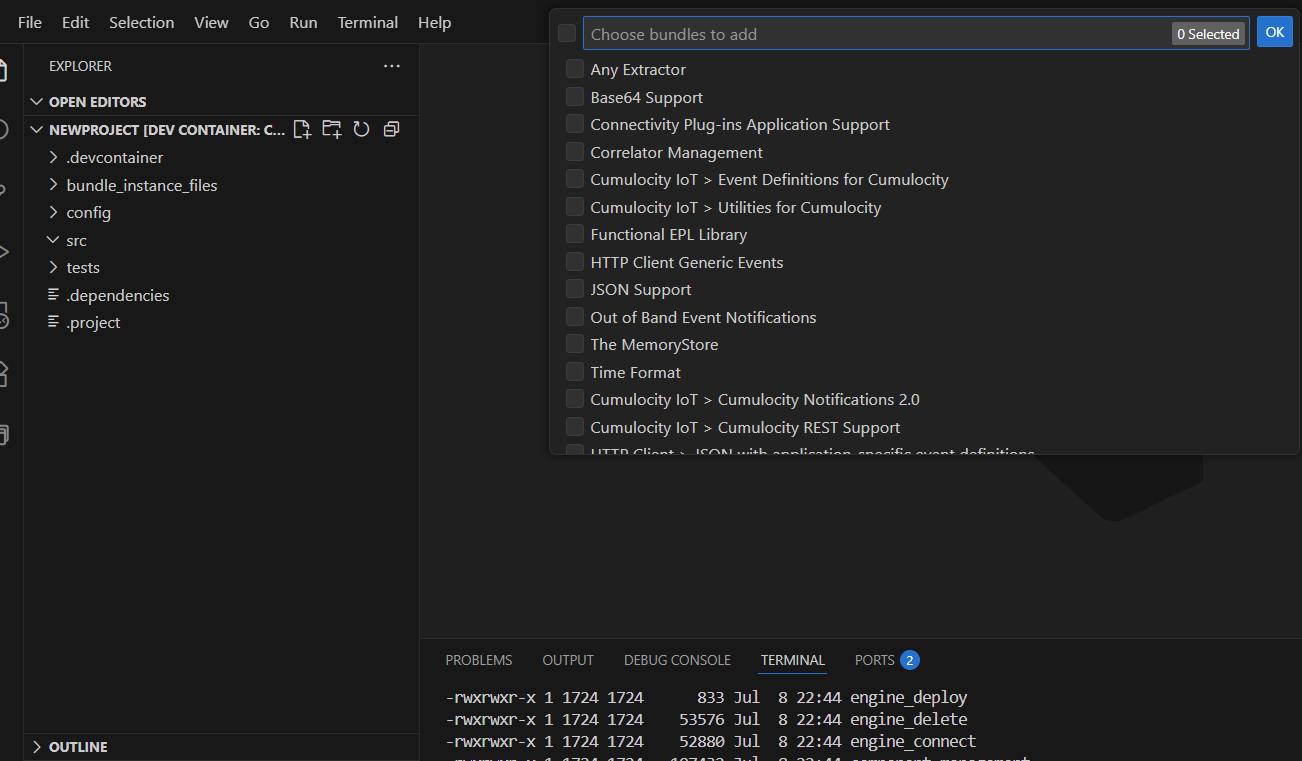
Add Product Bundles
-
Click the
 icon on your Apama project folder within
 Apama Projectsin the
VS Code Explorer.
-
Select the required product bundles for your solution.
Incase of Connecting your EPL with Cumulocity add the below bundles
Automatic onApplicationInitialization
Cumulocity IoT -> Cumulocity Notification 2.0

Begin Development
You’re now ready to:
-
Make changes to existing Apama
.monfiles -
Add new monitors or event definitions
-
Test and deploy within the dev container
-
Created sample .mon file in the monitors folder
sampel -
/**
* This application listens for all measurements of type
* "c8y_Temperature" with fragment "c8y_Temperature" and
* series "T", and raises a "TemperatureHighAlarm" if
* the temperature value exceeds 100.0.
*/
using com.apama.cumulocity.Measurement;
using com.apama.cumulocity.ManagedObject;
using com.apama.cumulocity.ObjectCommitted;
using com.apama.cumulocity.ObjectCommitFailed;
using com.apama.cumulocity.Event;
using com.apama.cumulocity.Alarm;
using com.apama.connectivity.ApplicationInitialized;


/**
* Create an alarm if a measurement exceeds a threshold value
*/
monitor AlarmOnMeasurementThreshold {

	// Measurement threshold. Raise an alarm if the temperature
	// exceeds this value
	constant float MEASUREMENT_THRESHOLD := 100.0;

	action onload() {

		log "measurementSubscription" at INFO;
		monitor.subscribe(Measurement.SUBSCRIBE_CHANNEL);
		log "Susbcribed measurement Channel" at INFO;
		on all Measurement() as m {
			log "I got a Measurement: "+ m.toString() at INFO;
		}

		monitor.subscribe(Alarm.SUBSCRIBE_CHANNEL);
		log "Subscribed Alarm" at INFO;
		on all Alarm() as a {
			log "I got an Alarm: " + a.toString() at INFO;
		}

		monitor.subscribe(Event.SUBSCRIBE_CHANNEL);
		log "Subscribed Event" at INFO;
		on all Event() as e {
			log "I got an Event: "+ e.toString() at INFO;
		}

		monitor.subscribe(ManagedObject.SUBSCRIBE_CHANNEL);
		log "Subscribed MO" at INFO;
		on all ManagedObject() as mo {
			log "I got an MO: "+mo.toString() at INFO;
		}

		//Create an Alarm
		send Alarm("","Test_Alarm","59147313444",1464365565.661,"No communication with device since 2016-05-27T18:11:23.886+02:00","Active","MAJOR",1,new dictionary<string,any>) to Alarm.SEND_CHANNEL;
		log "Sent a new Alarm" at INFO;

	}


}
Step 4: Start the Local Apama Correlator
Apama will be automatically installed within the WSL Dev container:
-
Start local Apama correlator:
Open a terminal in your dev container and run below command

correlator
OR
- Start local Apama correlator that will connect with Cumulocity tenant via Notification 2.0
correlator --config /opt/cumulocity/Apama/connectivity/bundles/CumulocityNotifications2Connectivity/CumulocityNotifications2.yaml --config /opt/cumulocity/Apama/connectivity/bundles/CumulocityConnectivity/CumulocityIoTDynamic.yaml --config /workspaces/newProject/config/connectivity/CumulocityNotifications2.0 -DCUMULOCITY_NOTIFICATIONS_SUBSCRIBER_NAME=TestSubscriber -DCUMULOCITY_NOTIFICATIONS_SUBSCRIPTION_NAME=TestSubscription -DCUMULOCITY_USERNAME={Your Cumulocity Tenant Username} -DCUMULOCITY_PASSWORD={Your tenant Password} -DCUMULOCITY_APPKEY=apama-ctrl-1c-4g -DCUMULOCITY_SERVER_URL=https://psin.eu-latest.cumulocity.com
Step 5: Inject Your Project into the Correlator
To run and test your Apama project locally, inject it into the running correlator using:
engine_deploy --inject localhost 15903 newProject/
Step 6: Code Commit
While commit the code into any repository remove your credentials from your project config
This will load your project into the correlator.
You can monitor the execution and output via the local correlator logs.
Next Steps - Run your Test using Pysys (Will be covered in part2)
- Write Tests for the EPL apps - Writing tests for EPL apps — EPL Apps Tools documentation
- Using PySys to test your EPL apps - Using PySys to test your EPL apps — EPL Apps Tools documentation
- Testing performance of your EPL apps - Testing the performance of your EPL apps and smart rules — EPL Apps Tools documentation
References
- Apama Debian Packages
- Apama VS Code Extension Guide
- EPL Apama Documentation
- The Cumulocity Transport Connectivity Plug-in - Apama
- Introducing the new Apama Extension for VS Code